Top 5 apps to edit your instagram pics (+ how I edit mine)
Hi there!
Today I’d like to adress a topic that is probably the question I get asked THE MOST on my instagram account: “How do you edit your pictures / which app do you use?” It’s a question not easily answered with 1-2 sentences, so I always feel bad for giving very vague guidelines. However! Today is the day I’d like to show you my top 5 apps I use for editing and how I use them on my pics. Let’s do this!
Why should I even care about editing my pictures?
First of all, let me say: there is no magical one app that makes all your pictures look beautiful and cohesive (unless you’re a photographical mastermind that only takes beautiful cohesive pictures..but then, you probably wouldn’t read this article.) I always use at least 2 apps for different things or even more, depending on the quality and content of the picture. Cause what always happens is this: You take a stunning picture that you want to share but..realize it doesn’t really fit your feed at all. Be it the colors, or a cluttered background, some pictures just don’t want to fit your feed no matter what. I hope you’ll get some pointers here on how to use these apps to make ALL your pictures fit, no matter what 🙂 You may think now “well, it’s not really *that* important for my pictures to all be perfectly cohesive…” I hate to disappoint you: I find, one thing that sets very popular accounts apart from other is, that all their pictures somehow fit beautifully into their bigger feed. So in my eyes, consistency is really important. Now that we have that out of the way, let’s start!
 Facetune – the basic one
 Facetune – the basic one
Facetune was the first editing app I owned on my phone, because it was free on the app store and I knew from some fellow instagram gals that they were using it. This app is pretty basic and a good app if you don’t know a lot about editing and want to start somewhere : get this app. It’s free, and while it is quite limited at what it can do, it’s very beginner friendly and intuitive to use. You can mainly use lighting and filters to color correct your pictures ; there are also some basic tools for cropping, smoothing, distorting and blur.
How I like to use it: I still use this app from time to time to adjust the colors and lights in my pictures. I often use the filters “Expose” (soft light) in combination with “Gamma” (adding more light + contrast). Due to my apartment situation and the German weather, my pictures turn out initially too dark a lot and I use this app to fix that. I also often use the “cool” filter (converting warm tones into cooler ones) in combination with “Orchid” (adding a pink and purple hue). I used to use these 4 steps in almost all my pictures so that they are cohesive: my pictures mostly have cool tones and always a pastel feel, so following these steps worked for a majority of my pictures. Moving on to…
Facetune 2: the Photoshop light
 Facetune 2: the Photoshop light
After a while, I felt Facetune just didn’t give me enough options to toy around with my pictures, so I downloaded Facetune 2. Until today, this is probably my most favorite app! You can do a LOT of things on here that you usually can only do in Photoshop or with other expensive tools: you can move objects around, selectively change colors and saturation, selectively merge two or more pictures together, remove backgrounds, you can even alter your face completely or add glitter eyeshadow. (Although I don’t recommend the last two as I think it looks very fake very fast.) In order to get all features, you need to upgrade to the pro version. However, every important tool I use and needed was already included in the free version so I don’t think upgrading is really necessary.
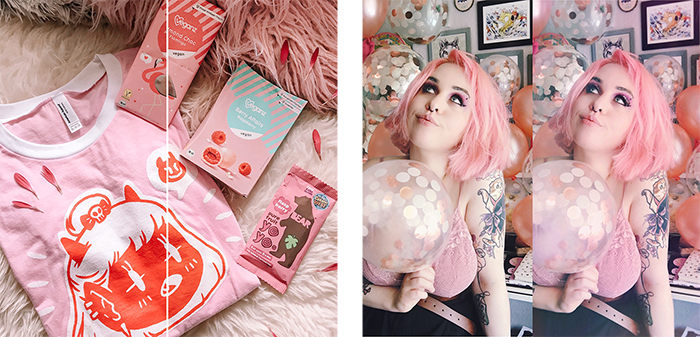
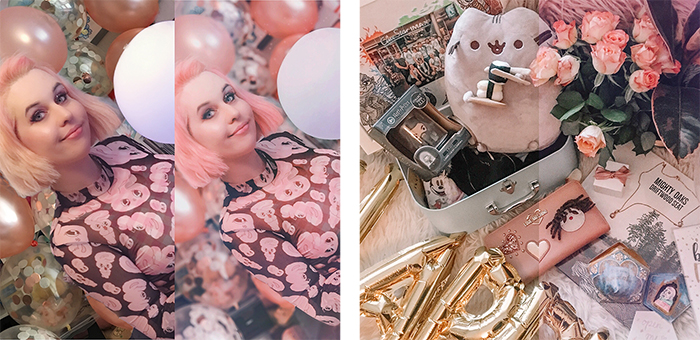
I mainly use this app for two things: color correction and a few filters that I really love. The tool I love about this app (and that isn’t included in Facetune) is the “paint” tool. With this tool, you can paint over any object and paint it a different color. In the past, I often struggled with the fact that I took a good picture, but certain areas in the picture were washed out: my hair was looking blonde- beige instead of the pastel pink it was in real life, or my mint dress looking like a green grey blob. So I often use this tool to selectively adjust the colors to make the colors more pop. This is especially important for any hair color pictures I take, cause my camera just NEVER captures how the color looks like in real life. Never. Trust me. I tried everything. Below, you can see two of my recently published pictures in their unedited (left) and final (right) version. Notice how the right ones have less green/yellow and the same kind of soft, pastel pink hue which is what my pictures are all about!
Another thing I almost always use are the filters “Gossip 4” and “Royal 1” in combination – both are pink based and give my pictures a more pastel pink feel. However, when these filters somehow don’t work, I just use several others in varying intensity until I’m satisfied. I would always recommend to NEVER use one filter 100% and it will always look super fake and overedited. I usually use my filters only in an opacity percentage of 1-20% and stack them on top of each other, going back and forth, until I’m satisfied. It’s really easy to get carried away while doing this, trust me – I’ve been there. However, it’s really important to always check if your pictures still look somewhat natural.
I also sometimes use the haze tool to make my backgrounds a bit blurry when my phone was overeager and didn’t capture the moment how I envisioned it in my head. If I could only use one app until the end of my time, it would probably be this one. Although it gives you a great range of basic and advanced tools, it is still super easy and intuitive to use. Also, their support is really great. When I once had a problem with the app crashing, they responded to me with a detailed step by step description in an hour!
Afterlight: the basic one II
 Afterlight: the basic one II
I downloaded this app because, again, many people told me they were using it and how great it is. For some reason, I never liked this app a lot. The filters are all very over the top and a lot of them are red and green based, which is not what I’m looking for in my pictures. What I DO like about this app though are the light effects that you can use that make your pictures just a little bit more professional looking. Also, you can make all basic edits, like changing contrast and saturation and so on. Additionally, you can make some pretty interesting and out-of-the-ordinary edits like adding shadows, mid tones, vignettes, and a ton of other edits. While it is not my favorite one, I have used this one in the past quite a lot – until a more shiny and beautiful one walked around the corner, namely….
Afterlight 2: the atmospheric one
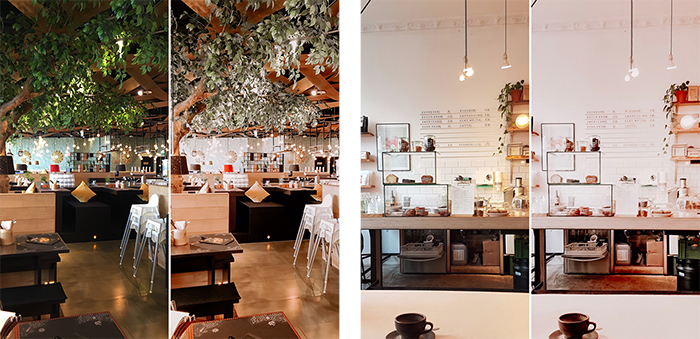
After toying around with Afterlight, I gave Afterlight 2 a shot: and what a delight it was! Compared to their first app, I really like it’s successor. Afterlight 2 doesn’t nearly give you as many options as Facetune 2 but there is one tool it does a lot better than it and that is: Light effects. While Facetune is more about optimizing your pictures, Afterlight focuses on a range of different light effects that can be customized in color, intensity and placement. I really love to add some subtle (again, never full intensity!) light effects to my pictures and give them a more “dreamy” vibe. I usually use Afterlight 2 as the very last step if I feel something is missing in my pictures. Sometimes it works, sometimes it’s too much but I love playing around and seeing the vibe of my pictures change. Again, here, don’t overdo it or it will be painfully obvious. You want to use these light effects in a subtle way so that they change the picture, but you can’t really see it. I used different light effects on these two pictures down below but unless you look really closely, they probably won’t stick out to the eye too much.
Adobe Lightroom: the actual mobile Photoshop
 Adobe Lightroom: the actual mobile Photoshop
Let me preface this by saying: While you can literally do ANYTHING to your pictures with Adobe Lightroom, I do not recommend this tool for total beginners. Lightroom offers an abundance of expert tools but I found this app really difficult to use in the beginning (and I’m fluent in Photoshop, haha.) it’s just a little hard to get into as there are so. many. options. And if you don’t know a lot about editing, color channels etc this can get overwhelming pretty fast.
However (there is always an however with these things ?) one thing that only Lightroom can give you are PRESETS. Presets are a time and life saver. You can actually change all the adjustments you have made in a picture as a “preset” and then use that as a filter. The difference to a filter though is that the presets actually contain ALL adjustments you have made, and not only color and light. It’s really cool to get “professional” looking pictures with a single click!
The cool thing about this, is that there are millions of presets out there that you can download and import into Lightroom (which is easy if you know how to do it – it actually took me a few hours to figure that out, haha). I haven’t found a single useful free preset tbh – I do think it’s totally worth though to invest in a few good presets as they will save you a lot of time and making your pictures all look cohesive was never easier. I do think most presets are best for wide outdoor shots – they don’t work too well with selfies or close-ups as the adjustments are often quite “extreme” and your pictures can look overedited very easily. I mostly use Lightroom for my outdoor shots or pictures from shootings I did. Here are some presets that I have bought and really liked:
Coachella Preset | Virgo Preset | Wonderland Pink Preset
(there are a lot of presets available on Etsy and most of them cost between 3-15€ which is pretty good as you might end up using them for years if you like them!)
I’ve only started to use Lightroom a few weeks ago actually, but I’m super stoked about all the presets and endless possibilities you have! With the right preset, I often have to only adjust a few things here and there and am already done!
These were my top 5 apps to edit your instagram pictures! I hope this answers at least some of your questions. I’m sorry that I can’t give you a complete step by step manual on how to edit your pictures – it always really depends on what you’re working with. If your picture has good coloring or was taken with a good camera you might not need to do much; other times, when you have a red and yellow mess of a picture with harsh shadows and washed out tones, you’ll need to work it a lot more. If you have any specific questions though, let me know in the comments and I’ll do my best to answer them ? If I missed anything, let me know so I can edit this or collect suggestions for a follow-up post in this series.
Wish you all a great Sunday lovelies!
Lots of love,
Sam