DIY Fabric Covered Buttoned Jewelry Storage
Happy Halloween sweethearts,
How are you all doing? I hope you have a good cup of tea against the maybe stormy autumn weather at your local spot! I, in the meanwhile, get really into a crafty mood when the days are getting shorter and darker. I usually have a lot of different ideas but barely the time to get them all done. I have a lot of notes and drawings in order to not forget all the ideas, I wish I had the time to get them all done! 😀 But I will, in February when I’ll be almost done with university, I definitely look forward to half a year only part time job and writing a thesis! So much time for crafty and creative stuff! :3
But let’s talk about the present. I never really had a spot for all my jewelry. I have a little box where I throw all my piercings inside but that’s it. I could of course take a box and put it all inside but well.. I don’t really like that idea. Plus, all my necklaces would be wrapped around each other I fear. :/ Not having a spot for all your jewelry is a really disadvantage: You’ll lose some of the jewelry, or just forget them because you don’t see them since they are waiting at some secret spot in your room. This situation led me to the thought of how could I make an easy and cheap display for my jewelry that somehow will look decent but not take up a lot of time? Here’s what I came up with: A buttoned jewelry storage made with fabric and buttons. It’s as simple as that. What you’ll need:
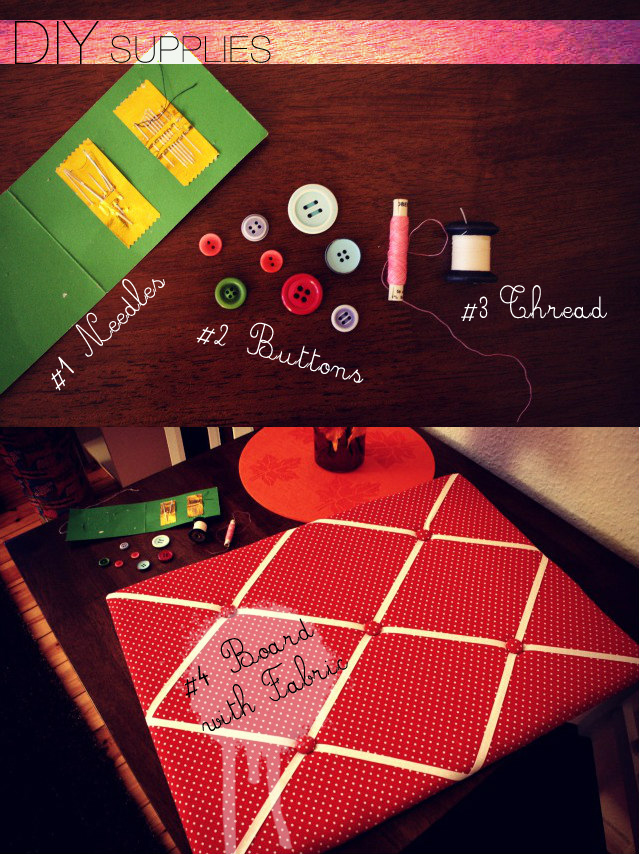
You’ll need various needles, buttons as many and in whatever design you prefer and thread that’ll match your buttons. I originally intended to make the pinboard with fabric myself, but I found a really cute and cheap one at my local crafting store so I bought the already premade one to save myself time and nerves! If you want/need to make a pinboard yourself you’ll additionally need fabric, a corkboard, ribbon, a staple gun and upholstery tacks.
Pinboard
#1 Cut the corkboard into your desired size. Do the same with the fabric but keep in mind that the fabric needs to be 5cm wider than the board on each corner so you can secure it to the board!
#2 Get a staple gun and secure fabric to board. I use the North – South – East – West technique of starting at a north point with a staple, then to south, then east and west in a clockwise action until all fabric is down. This makes it easier to get keep all fabric tight and at a good tension. The last thing you want is any baggy areas.
#3 Add your ribbon. Using your choice of embellishment (think grosgrain, hat elastic, printed ribbon, thick jute) secure it to the longest distance from the top left hand corner to the bottom right. Then, move up and down in a pre-decided measured amount until all rows are secure. Then, make the cross rows using lengths covering the opposite side until you achieve the criss-cross effect. I then use upholstery tacks (available in white, nickel, black or copper heads) to pin down into each cross over point.
Done! That was easy, wasn’t it? Don’t worry it won’t get much more complicated from now on. To use my pinboard as a jewelry storage I thought of adding buttons in various sized all over the board which can hold necklaces and bracelets. So Grab your buttons and sew them to the board!

.
Note: If you make your pinboard yourself it would be much more handy to sew on the buttons BEFORE you secure the fabric to your board. Since I bought my pinboard already done, sewing on the buttons was a bit more tricky because I could only work on the surface of the fabric and not on it’s back. The buttons therefore are not as tight as they would be otherwise. However, since I plan to only add necklaces to them it won’t be a problem of the buttons falling off. 🙂 Sewing on the buttons too tight to the fabric will make it harder to attach your jewelry in the end.
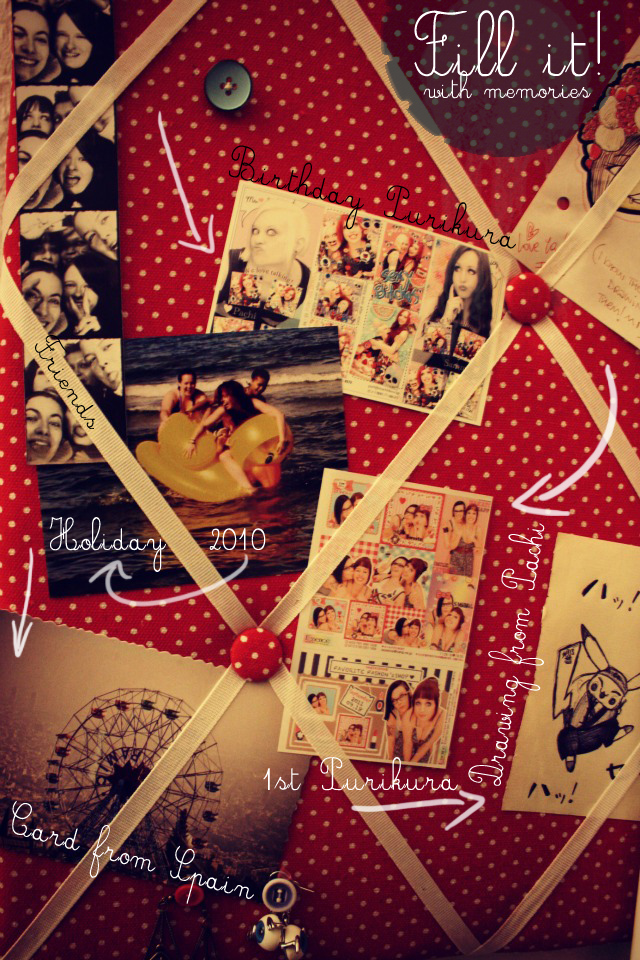
After adding the buttons, proceed with filling your board with memories, pictures, photographs, drawings… whatever you like! 🙂 I loved the idea of having a personal memorial pinboard and jewelry storage all in one.

Sorry for the blurry pic; I started the project in the very late afternoon and it turned dark before I finished. >_<“” I added some buttons at the button corner of the board and created a little space for my earrings. (BTW these are my new earrings from Gina Tricot, aren’t these just dramatic? 😀 )

Aaaand that’s it! Pretty easy right? I don’t have that much jewelry but now that I have a fun storage I’m eager to buy lots and lots 😀 I guess, this storage will look better the more jewelry’s hanging there. To balance it out I just added more pictures for now. How do you like this idea? I haven’t seen something similar so far so I thought it might be worth sharing 🙂 What do you use to store your jewelry?
Having a DIY post already, let me share something with you! I just received a lovely package from my beloved blogger friend Valentina Dang some days ago and guess what she sent me? Handmade jewelry and keychains! Some months ago, I explained her via Skype some methods of doing your own macarons with clay. I almost forgot it, but she followed my method and made her own macarons successfully – and sent me her very first handmade keychain as a thank you! Wow I honestly didn’t expect that and was really happy 🙂 Also, because she is just so talented at crafting! I feel a bit bad that she sent me her very first keychain she ever made because I guess there would be some emotional attachment to that..? But no worry Val, I’ll treasure it well!

How awesome is that envelope? She actually added rhinestones to the package! Chapeau! 😀

Look how adorable that keychain is! Can’t believe she did this herself. It consists of yellow macarons, little silver buttons (how suitable for this post), silver ribbons and some pink and silver pearls. I think it’s just adorably cute.
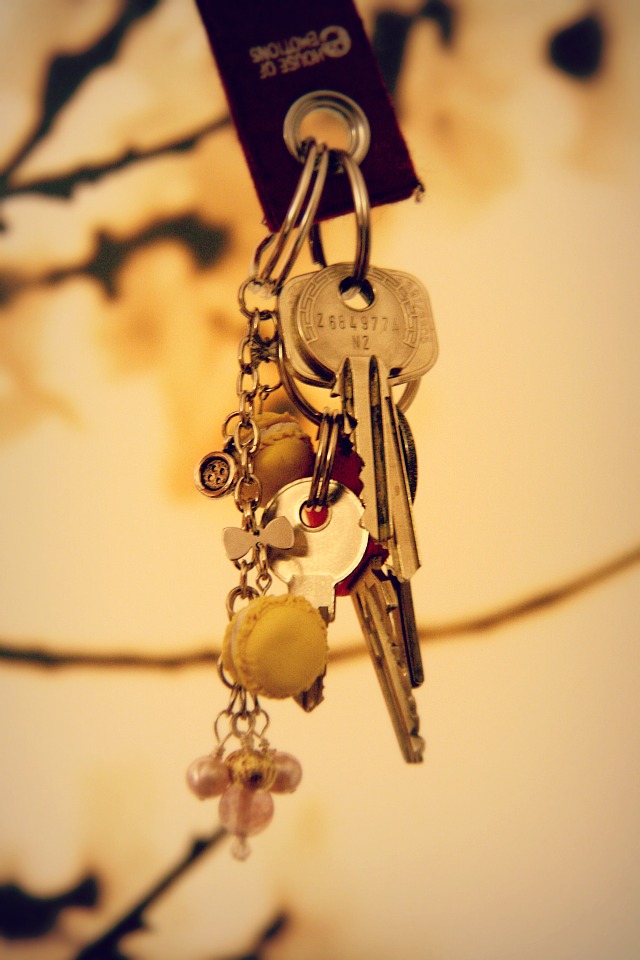
Attached it to my keys so I can carry it with me all the time 🙂 Although loaded the keychain isn’t heavy at all! My keys just got 1000% cuter lol :3

She even made a special bracelet for me! With a little silver camera pendant, I thought it was really suiting since my friends call me a photographolic. 😀 She put both in cute white organza bags, I guess you can tell I was just super happy to receive so much personal love in one package! Thank you again Valentina! <3
Wow, this post turned out pretty long! Don’t know how much of you are still reading this but thanks if you made it this far! I hope you liked my little DIY. I really want to make more in the future to spice up this blog a bit more, I actually love crafting and getting something done with my hands 😀 Have a good day everyone and talk to you soon!
Much love & See you soon.
Sam